Implement a Bulk Export Feature
Overview
In this guide you will learn how to create custom bulk operations in a Mosaic service.
This guide will walk you through the required steps to implement a bulk export feature
in the customizable media service that is part of the Mosaic Media Template. The general principles
described in this guide however apply also to other bulk operations.
We will walk through all required changes on both, the backend and the frontend.
Pre-Requisites
To follow along, you should have already completed the Mosaic Media Template setup.
Instructions on how to set it up can be found in the README.md file contained in
the Mosaic Media Template package and also described on the Mosaic Media Template Readme page.
Goal
The feature we want to implement here is a bulk operation for exporting Movie
data into a CSV file. This export functionality will be made available as a bulk
action in the Movies explorer station. Editors should be able to select the entities
they would like to export and then fire the operation. After that the CSV file should be downloaded.
Once you have walked through this guide, you should have enough information to conduct your own custom implementation of a bulk action for your use cases.
Exporting Media Data
We will split the task into two parts:
-
Adding a new mutation to the backend GraphQL API for exporting
Moviesin CSV format. -
Adding a new bulk action to the explorer station of
Moviesin order to allow editors to export movie titles of their choice into a CSV file.
Both of these processes are further described below.
Adding a New Mutation to the Backend GraphQL API
Let’s start by adding the backend support for bulk export functionality.
We will create a new GraphQL plugin named BulkExportMoviesPlugin.
This plugin will define a new mutation in the backend GraphQL API for exporting Movies.
-
Create a new file for the plugin at:
services/media/service/src/domains/movies/plugins/bulk-export-movies-plugin.ts. -
We will start by adding an interface that we will use as the response type for the new mutation. This interface should extend
BulkOperationResultand add a new property that will later hold the exported CSV data:services/media/service/src/domains/movies/plugins/bulk-export-movies-plugin.tsimport { BulkOperationResult } from '../../graphql'; interface BulkExportResult extends BulkOperationResult { exportData: string; // <--- returns the exported data in CSV format } -
Next we will create the new mutation plugin
BulkExportMoviesPlugin.
To do that let’s add the following content to the same file:services/media/service/src/domains/movies/plugins/bulk-export-movies-plugin.tsimport { GraphQLInt, GraphQLList, GraphQLNonNull, GraphQLObjectType, GraphQLString, } from 'graphql'; const bulkExportPayload = new GraphQLObjectType({ name: 'BulkExportPayload', description: 'Bulk export mutation payload type.', fields: () => ({ exportData: { description: 'Exported CSV data.', type: GraphQLNonNull(GraphQLString), }, affectedIds: { description: 'Array of affected item IDs', type: GraphQLList(GraphQLInt), }, totalCount: { description: 'Total number of affected items.', type: GraphQLInt, }, }), }); const bulkExportResolverBodyBuilder = (): BulkResolverBodyBuilder => async ( ids, filter, context, _input, token, ): Promise<BulkExportResult> => { // Query data that should be exported from the database. // You may also make API requests to other services here in order to fetch data that should be exported. If authentication is needed, you can either use: // - User token - available in `token` variable above. (usually recommended) // - Service account token - can be retrieved by calling `requestServiceAccountToken` method in `token-utils.ts`. const exportData = await select( 'movies', { id: c.isIn(ids as number[]) }, { columns: ['id', 'title'], }, ).run(context.pgClient as Client); return { // Construct export data in CSV format. // No text encoding is used here since we are only exporting text (CSV) data. // Exporting binary data would require the data to be encoded using a binary to text encoding scheme such as Base64. exportData: 'ID,Title\n' + exportData.map((data) => `${data.id},"${data.title}"`).join('\n'), affectedIds: ids, totalCount: ids.length, }; }; /** * A bulk mutations plugin for exporting movies in CSV format. */ export const BulkExportMoviesPlugin: Plugin = BulkMutationPluginFactory( ['movies'], // Name of the database table to export data from. buildBulkActionSettings({ mutationNameBuilder: () => 'exportMovies', // Name of the new mutation to be added to the backend API. outType: bulkExportPayload, resolverBodyBuilder: bulkExportResolverBodyBuilder(), }), );Let’s have a closer look on what we just added:
-
The
bulkExportPayloaddefines the required GraphQL information for the return type we created in the previous step. This information will end up in the GraphQL schema and allows consumers of the API to better understand the meaning as well as the types of our returned values. -
The
BulkExportMoviesPlugindefines the GraphQL plugin that will add a new mutation for exportingMovies. We are passing inmoviesas the name of the database table that we wish to export data from.exportMoviesis the name of the new mutation which will be added to the GraphQL API by the plugin. -
The
resolverBodyBuilderproperty is the function that will contain the business logic of the bulk operation. In our case it is implemented inbulkExportResolverBodyBuilder. It will create the CSV content we like to export. The implementation above exports ID and Title of theMoviesin CSV format. It can of course be adopted to export any of the properties of a media entity to an export file format of your choice.
-
-
In order for the service to know about our newly created plugin, we need to register it on the
AllMoviePluginsobject:services/media/service/src/domains/movies/plugins/all-movie-plugins.tsimport { makePluginByCombiningPlugins } from 'graphile-utils'; import { BulkExportMoviesPlugin } from './bulk-export-movies-plugin'; export const AllMoviePlugins = makePluginByCombiningPlugins( ... BulkExportMoviesPlugin, // <--- add this line ); -
In order for the new
exportMoviesmutation to be exposed by the service, we still need to define the permissions for it. We will do this by adding the mutation to theMoviesMutateOperationsgroup so our mutation will require the same permissions as the other movie mutations.services/media/service/src/domains/movies/operation-groups.tsimport { Mutations as M } from '../../generated/graphql/operations'; export const MoviesMutateOperations = [ ... M.exportMovies, // <--- add this line ]; -
With this you should be able to see the mutation being exposed on the GraphQL interface of the service.
Adding Export Bulk Action to the Media Workflows
Now that the media service GraphQL API exposes our new mutation for exporting
Movies, we can update the Movies explorer station of the media workflows
to include the bulk action to Export the data using the following steps:
-
The code that should be updated is located in
services/media/workflows/src/Stations/Movies/MoviesExplorer.First, we will write the required GraphQL client code and generate the Typescript types for calling the
exportMoviesmutation.-
Update
Movies.graphqlfile and add the new mutation.mutation BulkExportMovies($filter: MovieFilter) { exportMovies(filter: $filter) { affectedIds exportData } }NoteWhen starting to type the mutation name, the solution should start auto-completing the mutation name. If this does not show up or the line gets underlined in red, you might need to run the >Apollo: Reload schemaVisual Studio Code command once, using the Command Palette. This will make the Apollo extension aware of the changes to the GraphQL schema applied in the previous steps. -
Execute the command
yarn codegenfrom theservices/media/workflowsfolder. This will generate the Typescript typings for the GraphQL client code written in*.graphqlfiles, and these types can later be used in your Reacttsxfiles.
-
-
Now you can proceed to create the
Exportbulk action inMoviesexplorer.services/media/workflows/src/Stations/Movies/MoviesExplorer/Movies.actions.ts... const getExportDataDownloadUrl = (exportData: string): string => { const exportDataBlob = new Blob([exportData], { type: 'text/csv', }); return URL.createObjectURL(exportDataBlob); }; const exportBulkAction: ExplorerBulkAction<MovieData> = { label: 'Export', onClick: async (arg?: ItemSelection<MovieData>) => { let exportData: string | undefined = undefined; switch (arg?.mode) { case 'SINGLE_ITEMS': exportData = ( await bulkExportMovies({ variables: { filter: { id: { in: arg.items?.map((item) => item.id) }, }, }, }) ).data?.exportMovies?.exportData ?? ''; break; case 'SELECT_ALL': exportData = ( await bulkExportMovies({ variables: { filter: transformFilters(arg.filters) }, }) ).data?.exportMovies?.exportData ?? ''; break; } if (exportData !== undefined) { // Trigger a "file download" for the exported data. const anchor = document.createElement('a'); anchor.href = getExportDataDownloadUrl(exportData); anchor.target = '_blank'; anchor.rel = 'noreferrer'; anchor.download = 'export-data.csv'; document.body.appendChild(anchor); anchor.click(); document.body.removeChild(anchor); } }, actionType: PageHeaderActionType.Context, icon: IconName.External, // Can be an existing enum value or a URL to an SVG icon. reloadData: false, // No need to reload data since the bulk action does not mutate data in the backend. }; ... return { bulkActions: [ ... exportBulkAction, // <--- register the new export bulk action here. deleteBulkAction, ], };Let’s have a closer look on what we just added:
-
First we define a helper function
getExportDataDownloadUrlwhich we will use later when we want to create the Blob URL to trigger the download on the browser. -
Next we declare the actual bulk operation
exportBulkAction. We define some metadata for the action but most importantly aonClickhandler which will be invoked when a user selects our operation.
The method consists of two sections:-
First we’re calling the mutation we just created on our backend service.
By defaultExplorercomponents allow two selection modes: One mode allowing an editor to hand select specific items from the list. The other mode allows the editor to activate a checkbox on top of the list, which effectively selects all the items in the list.
In the first mode (SINGLE_ITEMSmode), our handler will receive an array with all items that were selected by the user. We can use these to create anid: { in: […]}filter for our mutation.
In the second mode (SELECT_ALLmode),the client is not able to enumerate the items, as not all of them may be loaded to the client due to paging. So instead the handler will receive the filter configuration, which we can use to create a specific filter configuration for the GraphQL mutation. We make use of thetransformFiltershelper which is already available on theuseMoviesActionshook. -
After we got the response of the mutation, we take the
exportDatawe received and initiate a download of that data on the client browser.
-
-
As last thing in that file, we added our
exportBulkActionto thebulkActionsarray that gets returned from the hook. The value returned from the hook is already passed into theExplorercomponent’sbulkActionsproperty, so we don’t need to do anything further.
-
-
After saving all the changes, the workflows project should automatically rebuild itself and start serving the updated station.
Results
Follow the steps below to check whether everything works:
-
Open the Management System in your browser: navigate to
http://localhost:10053and click the Movies tile to open the respective explorer view.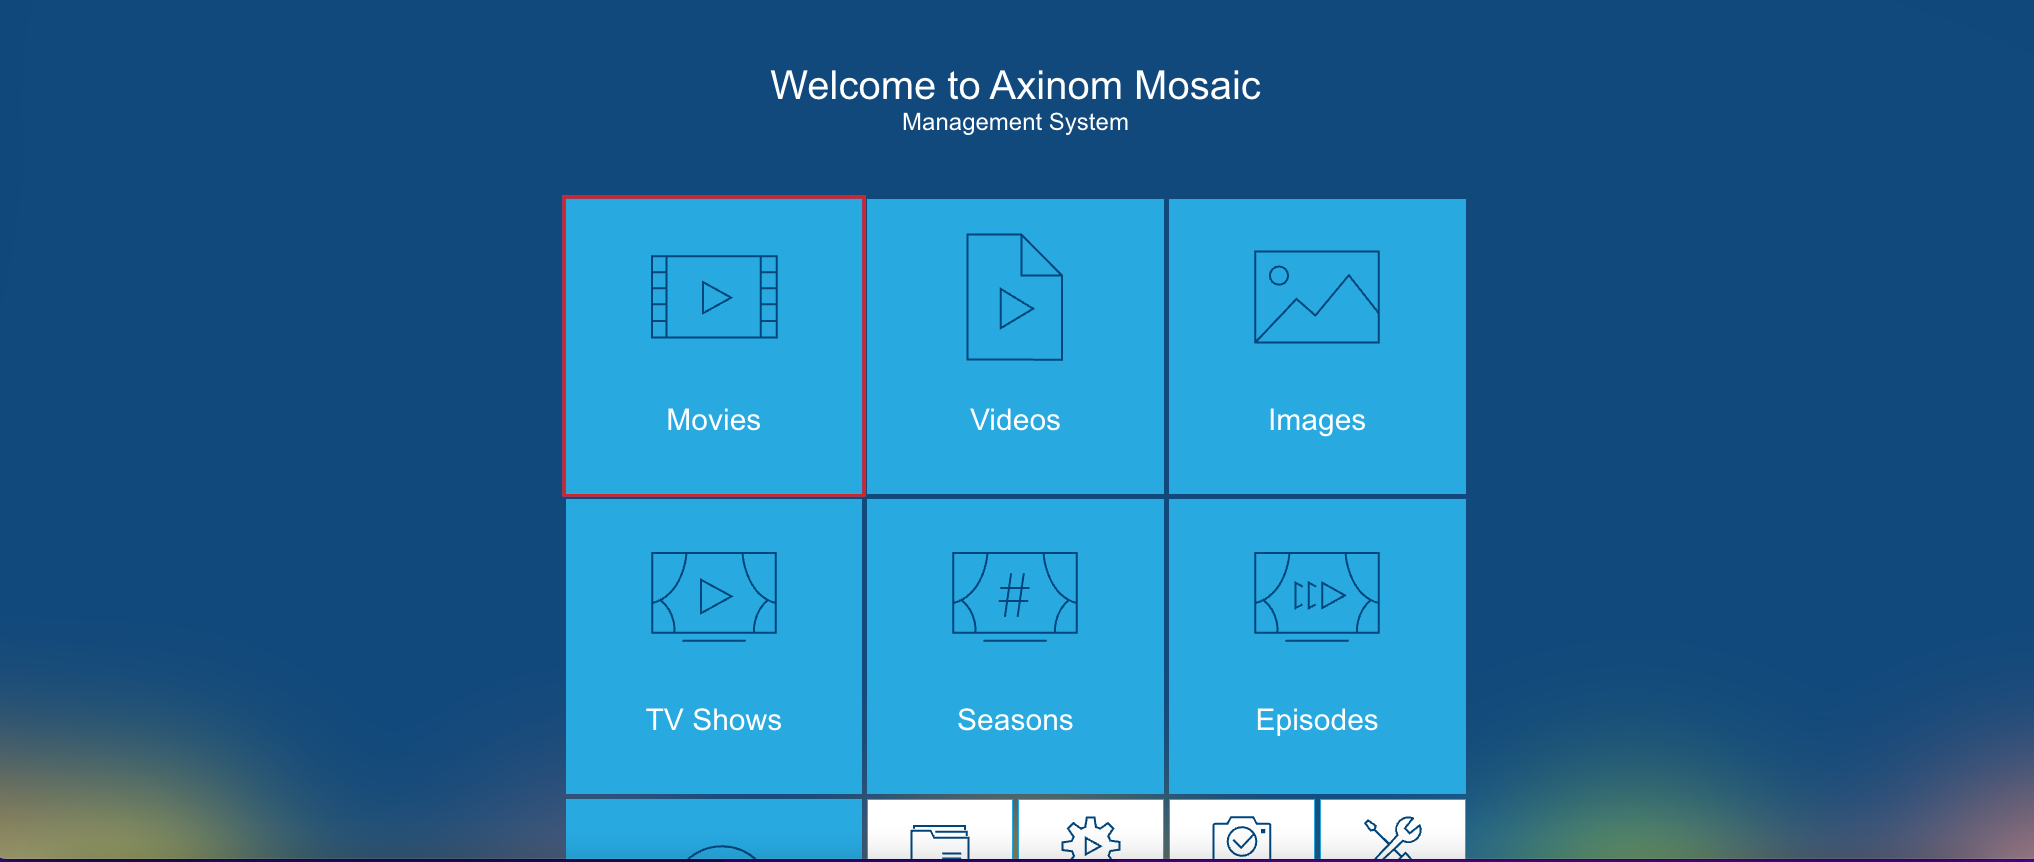
-
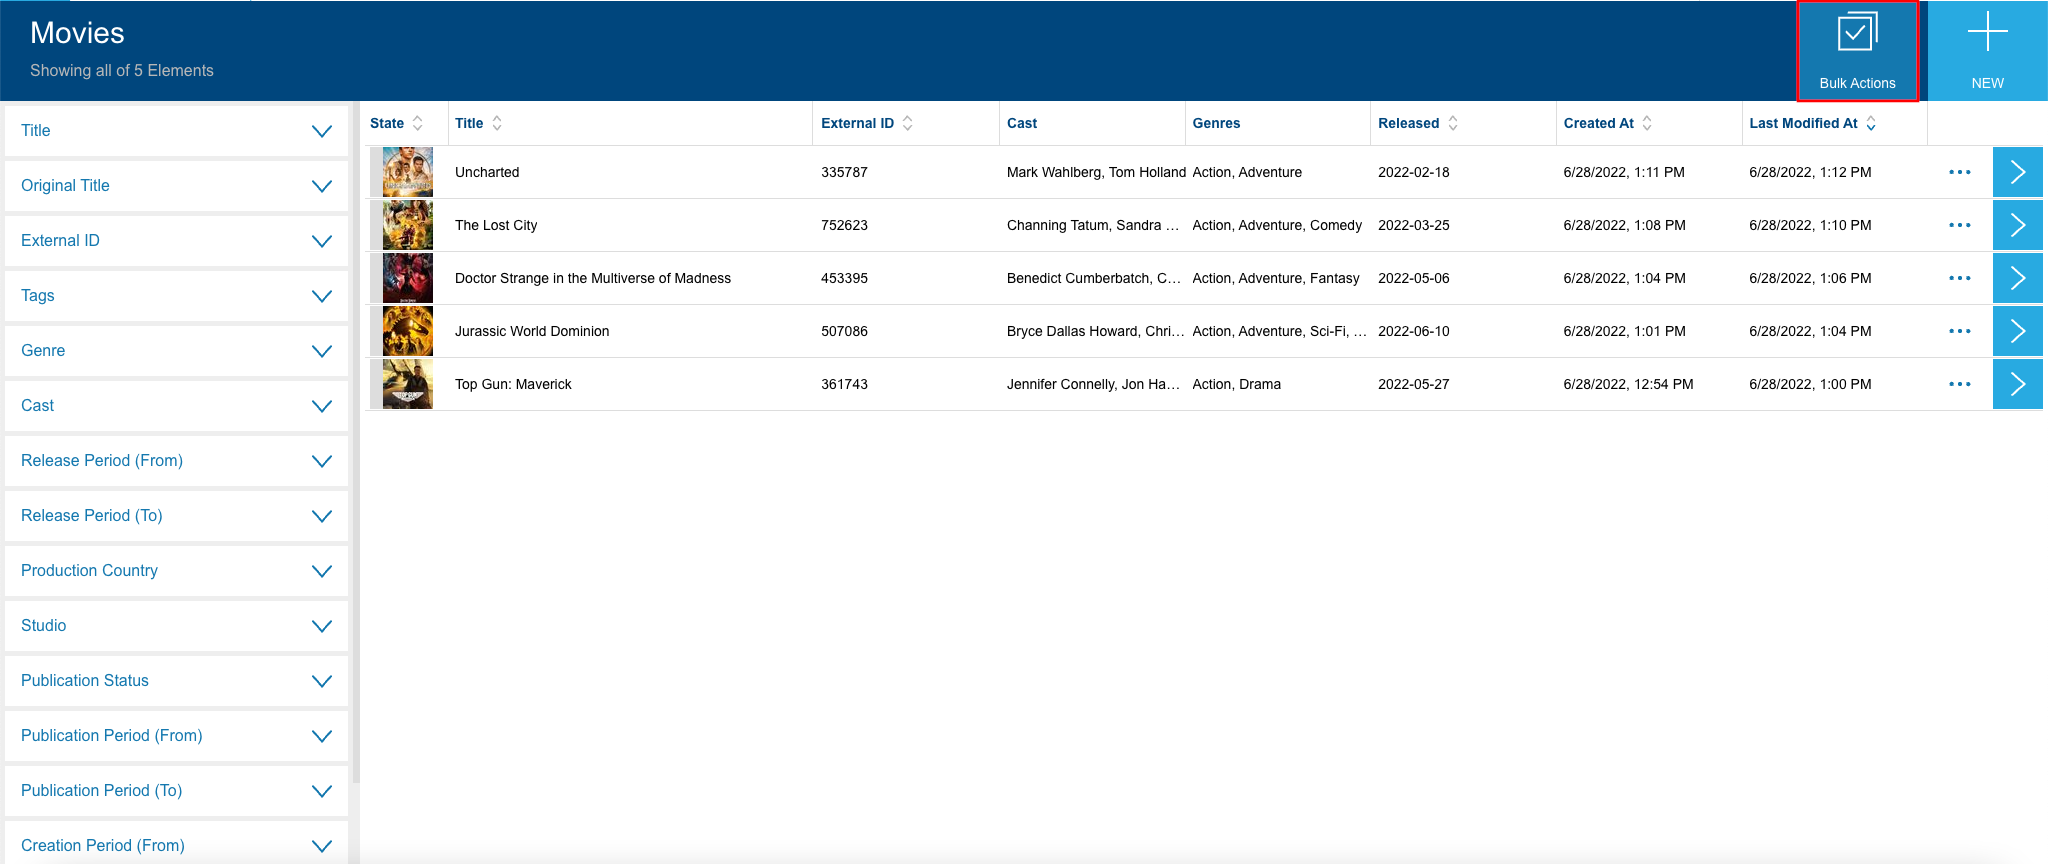
Click on the Bulk Actions button.
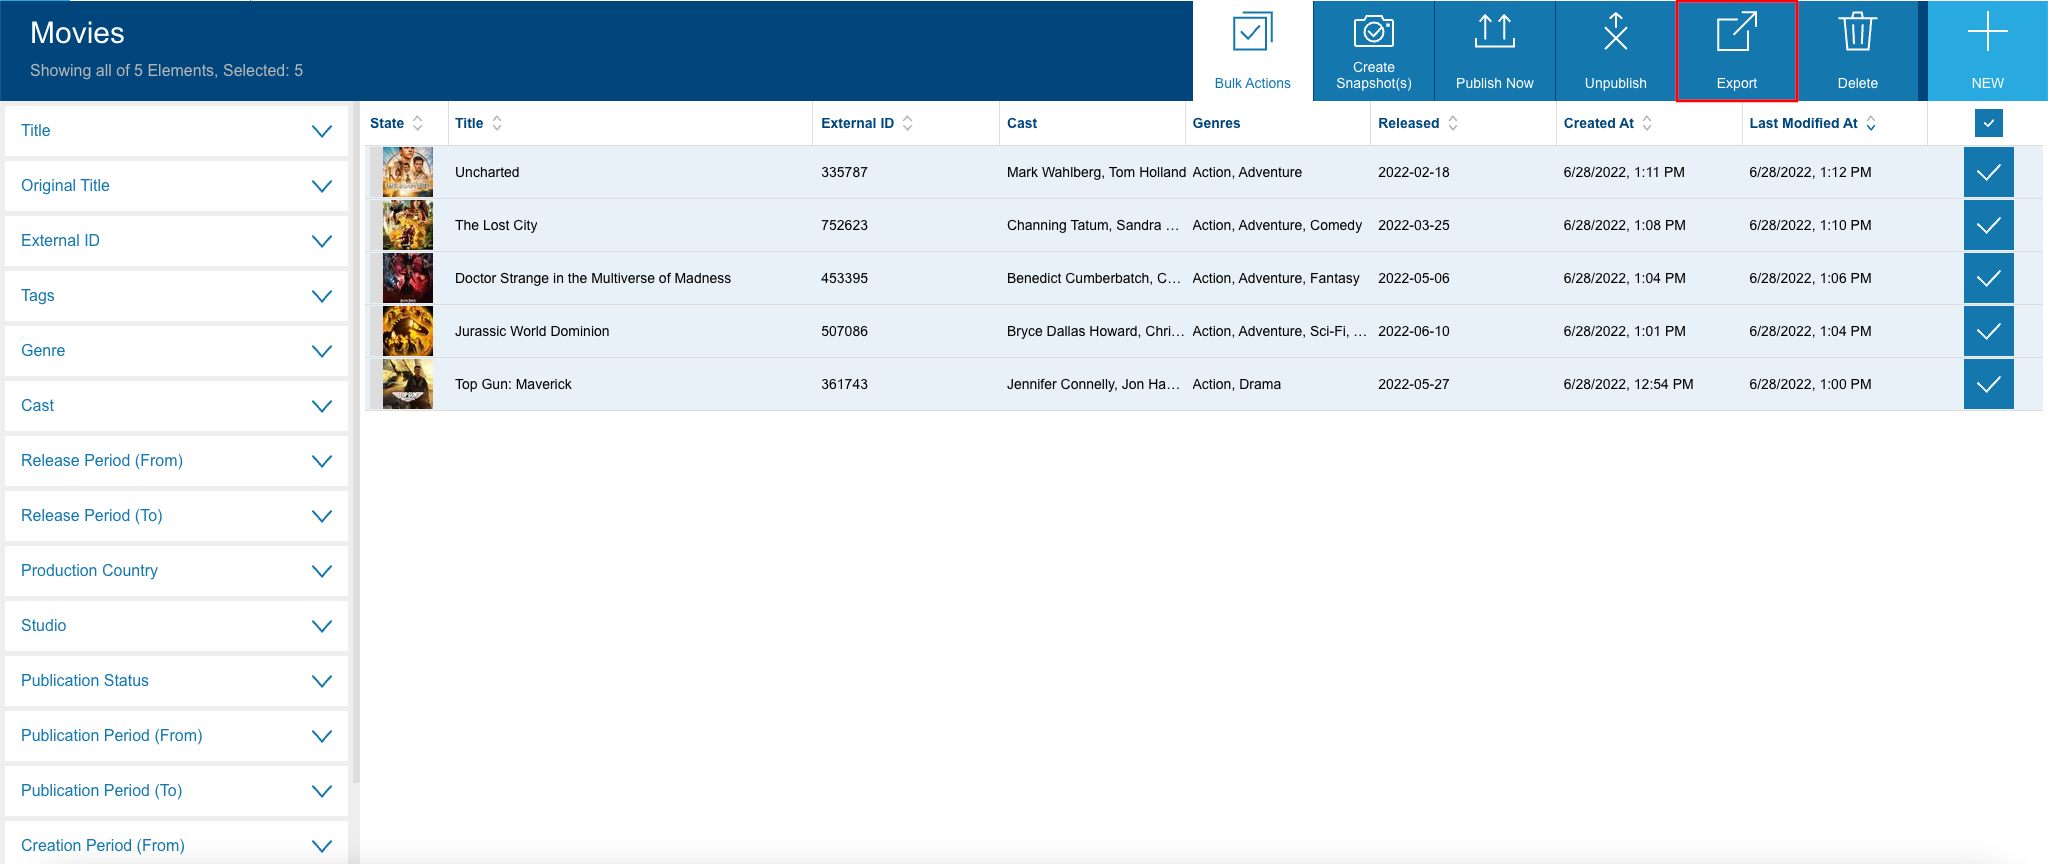
-
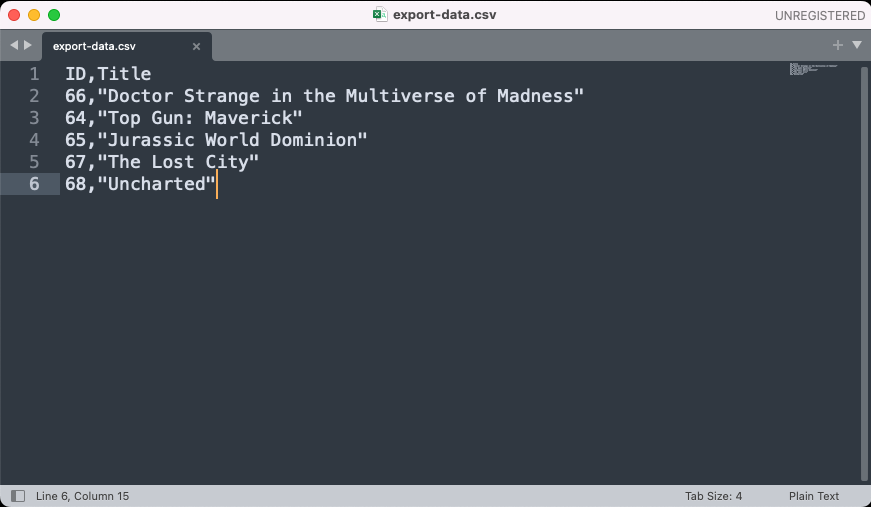
Select some movies that you wish to export and click on Export button.
-
This should open up a save file dialog, allowing you to save the exported movie data into a CSV file. The resulting file should contain ID and Title of the exported movies in CSV format.