@axinom/mosaic-managed-workflow-integration
This package provides types and helpers for integrating with Axinom Mosaic Managed Workflows.
Some of the features provided by this package rely on the PiletApi object that is provided to the setup method of a Pilet.
Make sure to call the initializeIntegrationLib method with the PiletApi object as an argument before using these helpers.
Working with Extensions
This library offers helper methods to obtain objects containing the bound components for the various service extensions.
There are multiple ways how these components can be integrated into your app. The workflows in the template are using a React context to provide the extensions to the components. This is implemented in the ./externals/piralExtensions.tsx file.
The implementation consists of the follow these steps:
-
Import the necessary types and helper methods into your app:
import { bindImageExtensions, bindVideoExtensions, // ... ImageExtensions, VideoExtensions, // ... extensionDefaultValue, initializeIntegrationLib, } from '@axinom/mosaic-managed-workflow-integration'; -
Use the exported *Extensions types to create a typed React context:
export type Extensions = ImageExtensions & VideoExtensions; // & ... export const ExtensionsContext = React.createContext<Extensions>({ ImageCover: extensionDefaultValue, ImagePreview: extensionDefaultValue, ImageSelectExplorer: extensionDefaultValue, ImageSelectField: extensionDefaultValue, VideoSelectField: extensionDefaultValue, VideoSelectExplorer: extensionDefaultValue, // ... }); -
Use a method that runs on the pilet setup to use the
bind*Extensionsmethods to bind the wanted extensions and return them in an object:export const bindExtensions = (app: PiletApi): Extensions => { return { /** Video Extensions */ ...bindVideoExtensions(app), /** Image Extensions */ ...bindImageExtensions(app), }; }; -
Wrap the station components that need the extensions in the context provider, providing the object returend by
bindExtensionslike:const extensions = bindExtensions(app); app.registerPage( '/movies/:movieId', () => ( <ExtensionsContext.Provider value={extensions}> <MovieDetails /> </ExtensionsContext.Provider> ) );
|
Note
|
The bound components are strongly typed, using types provided by the library, making it easier to use them in your app. |
Image Workflow Integration
The Integration library provides helper methods and types for integrating image service extensions into customizable service workflows. These extensions include components for image cover, preview, explorer, and selection fields.
Micro-frontend Extensions
The shared extensions can be obtained by calling the bindImageExtensions method, which returns an object containing all the bound components for the image service extensions.
The extensions provided by the ImageService are as follows: - ImageCover - ImagePreview - ImageSelectExplorer - ImageSelectField
Thumbnail Renderer
The createThumbnailAndStateRenderer can be used as a column renderer for Exporers that displays a thumbnails as well as an (optional) state badge:

The usage in an Explorer column works like this:
export const publicationStateMap: ColumnMap = {
  [PublicationState.NotPublished]: '#DDDDDD',
  [PublicationState.Changed]: '#FFC81A',
  [PublicationState.Published]: '#95C842',
};

const columns = [
  {
    propertyName: 'publicationState',
    label: '',
    render: createThumbnailAndStateRenderer('images', publicationStateMap),
    size: '80px',
  },
  // ...
]
The renderer will in this case use the publicationState value and the publicationStateMap to determine the state badge color for each thumbnail. The value of the images property will be used as the thumbnail url.
To learn more about other options the createThumbnailAndStateRenderer function is supporting, refer to the documentation of the function in our TypeDocs.
|
Note
|
Before using the renderer, make sure to have called the initializeIntegrationLib method with the PiletApi object as an argument.
|
|
Tip
|
The renderer can also be used on an unbound column and/or provide an empty state map to only render the thumbnail. |
The renderer will use the column data and a state mapping that can be provided to determine the state badge for each thumbnail. The thumbnail url can be pro
Video Workflow Integration
Micro-frontend Extensions
The shared extensions can be obtained by calling the bindVideoExtensions method, which returns an object containing all the bound components for the image service extensions.
The extensions provided by the ImageService are as follows: - VideoSelectExplorer - VideoSelectField
Video Cue Points
Additionally, the library provides getVideoCuePointsData function, you can easily retrieve the cue points data associated with a video. This data can then be used in your app to implement features such as navigating to specific points in the video or displaying additional information at specific cue points.
|
Note
|
Before using the renderer, make sure to have called the initializeIntegrationLib method with the PiletApi object as an argument.
|
Route Resolver
The Video Pilet registers route resolvers for some of its stations, allowing other Pilets to navigate to those specific video stations. These route resolvers are intended for use in other Pilets within your application.
The @axinom/mosaic-managed-workflow-integration library provides the VideoStationNames enum, which contains the names of the video stations for which route resolvers are registered. You can use these names to retrieve the routes for specific video stations using the resolveRoute method.
Here’s an example of how to use the resolveRoute method to retrieve the route for a video station:
import { VideoStationNames } from '@axinom/mosaic-managed-workflow-integration';

// ...

const navigateToVideoDetails = (videoId: string) => {
  const videoDetailsRoute = app.resolveRoute(VideoStationNames.VideoDetails, '123');
  React.history.push(videoDetailsRoute);
};
By calling the resolveRoute method with the appropriate station name from the VideoStationNames enum and any required dynamic segments (e.g., '123' in the example), you can retrieve the route for the desired video station. Then, you can navigate to that route using your preferred navigation method (React.history.push in the example).
By utilizing the registered route resolvers, you can facilitate seamless navigation to specific video stations provided by the Video Pilet within your application.
Localization Workflow Integration
To integrate with the Localization Pilet, this library provides types and helper functions for generating routes to the embedded localization stations.
The library includes the registerLocalizationEntryPoints function for embedded route registration. This function needs to be called in the Pilet registration function as shown below:
  import { registerLocalizationEntryPoints } from '@axinom/mosaic-managed-workflow-integration';

  // Generate entry points to embedded localization stations
  registerLocalizationEntryPoints(
    [
      {
        root: routes.channelDetails,
        entityIdParam: 'channelId',
        entityType: 'channel',
      },
    ],
  );
By using registerLocalizationEntryPoints, you will register localization pages with the specified root path, such as 'channel/:channelId', and additional localization-specific route segments.
This registration will generate the following routes:
-
channel/:channelId/localization- Localization locale explorer station for the channel entity. -
channel/:channelId/localization/:locale- localizationSourceId: Localization details station for the channel entity.
You can later access the registered routes using the getLocalizationEntryPoint method. This allows you to add links to the entities' details pages. Here’s an example:
import { getLocalizationEntryPoint } from '@axinom/mosaic-managed-workflow-integration';

// ...
const localizationPath = getLocalizationEntryPoint('channel');

// use it when navigating to the localization station
history.push(localizationPath.replace(':channelId', '123'));
In the example above, the getLocalizationEntryPoint method is used to retrieve the route, which is then added to the details station actions under the "Localizations" action:
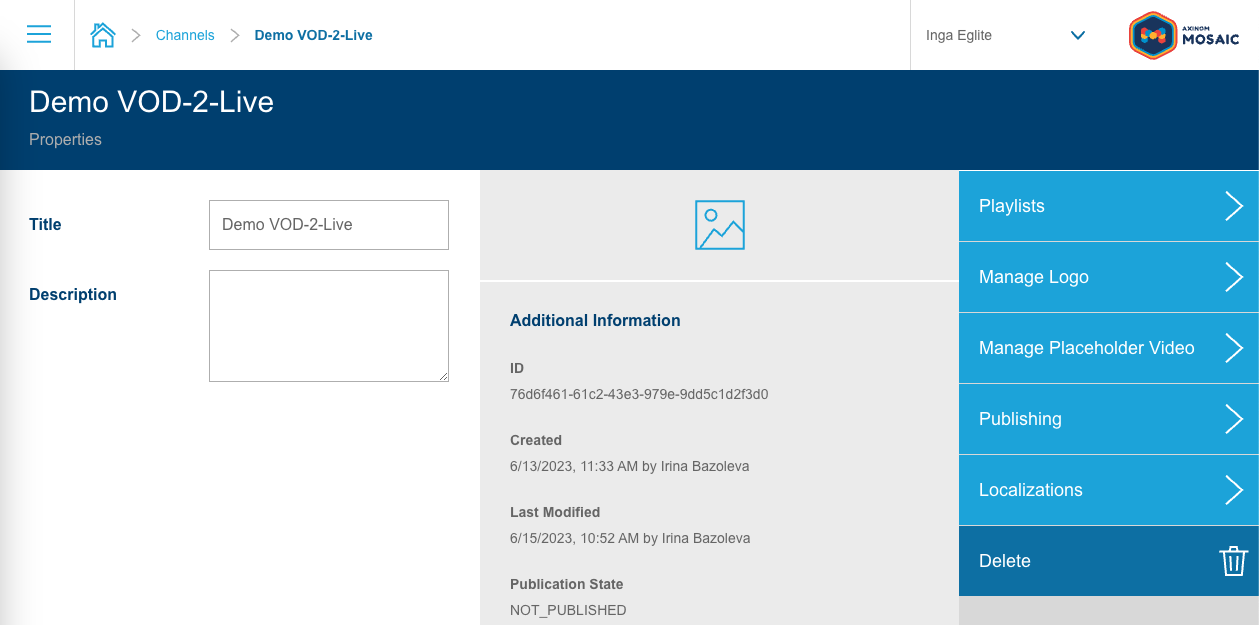
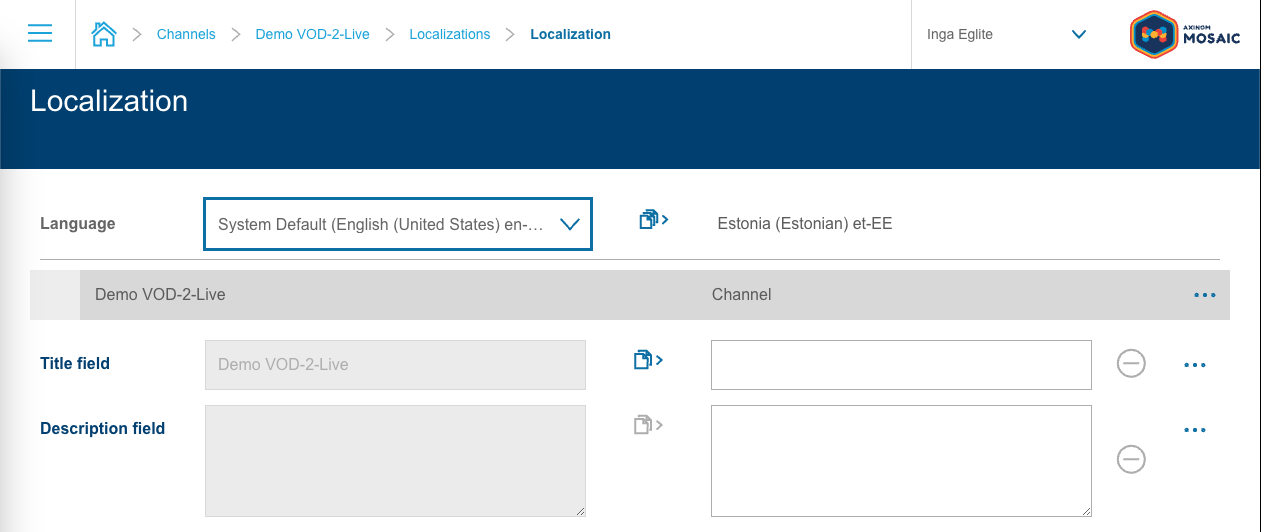
Clicking on the "Localizations" action will lead to the generated locale station, listing all available locales for the channel entity:
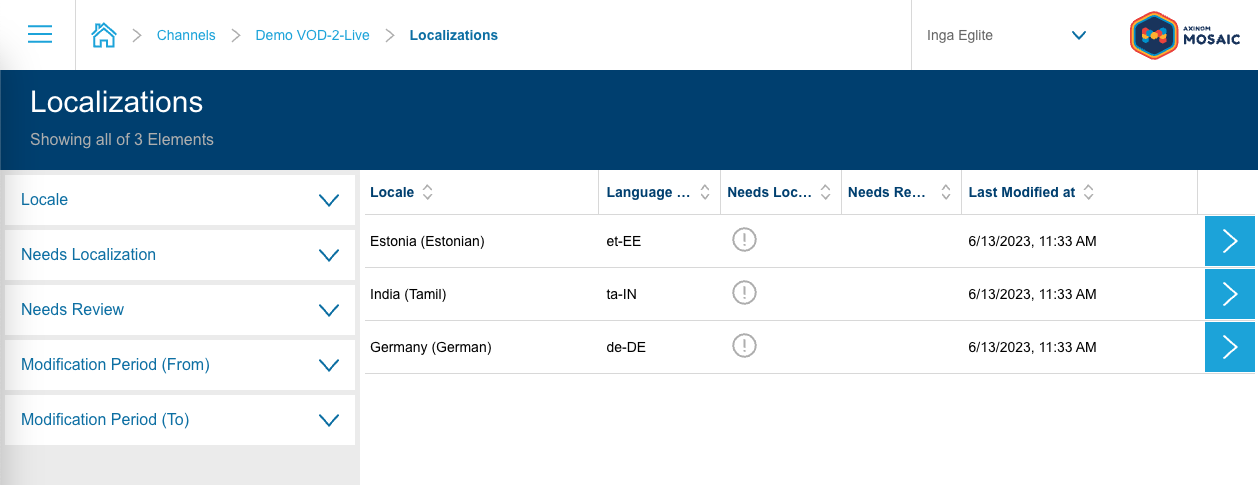
Selecting any of the locales from the locale station will further lead to the localization details station under the generated path: