@axinom/mosaic-portal
This is the Piral Emulator package of the Mosaic Management System (see Piral documentation).
This package is used on development time to host and orchestrate the micro-frontends. It effectively emulates the Shell application that is also used when a pilet is running in production.
The most important type defined in the package is the PiletApi, which is the interface that the micro-frontends use to interact with the Shell application. Each pilet will get a reference to the PiletApi instance passed to the setup method when it is loaded.
In the following sections, we will describe the different features that the PiletApi interface offers.
PiletApi
The PiletApi offers a variety of functions and features that pilets can use. In the following sections we group the functions by their purpose and explain their purpose and how they could be used by pilets.
Pages
Probably the most important feature of the PiletApi is the ability to register pages. Pages are the main way to navigate between different parts of the application. The Shell application will render the page that matches the current URL.
It is the way to tell the global router of the Shell application which pages are available and how to render them.
-
registerPage- to register a new page -
unregisterPage- to unregister a page
A general description on the page registration can be found in the Piral documentation.
The registerPage method takes three parameters: the route, the Component to render and a meta object.
We use custom properties on the meta object to enable and control two additional features:
Breadcrumb
The application shell displays a breadcrumb navigation that shows the current navigation path to the user.

The breadcrumb property on the meta object is used to define the text that should be displayed in the breadcrumb navigation for the registered page. This property expects a function that receives the current route parameters and returns the text to display. The function can either directly return the value or a promise that resolves to the value. This is helpful when a request to the backend is required to retrieve the text to display.
When a user navigates to a page, the shell calculates the breadcrumb based on the current URL and the registered pages, by traversing the URL segments from end to start and looking for matching pages.
So for example if a user visits the route /a/b/c/d the system will build the breadcrumb by looking for pages that match the routes in this order:
-
/a/b/c/d -
/a/b/c -
/a/b -
/a
If no page is found for a route, the system will not display a breadcrumb for this route segment and continues with the next segment. If a page registration is found for a route, the breadcrumb text is retrieved using the function passed to the breadcrumb property on the meta object and the breadcrumb is displayed.
Permissions
Another feature that can be controlled using the meta object is the permissions that are required to access the page.
The permissions property expects an object that matches the following format:
type PermissionDefinition = { [serviceId: string]: string[] };so for example:
const movieStationPermissions: PermissionDefinition = {
    'media-service': [
        'ADMIN',
        'MOVIES_EDIT',
        'MOVIES_VIEW'
    ]
};
This example would require the user to have at least one of the permissions ADMIN, MOVIES_EDIT or MOVIES_VIEW for the media-service to access the page.
|
Note
|
Be aware that a user will be allowed to access the page if it has at least one of the listed permissions. More granular permission checks need to be implemented in the page component itself. |
Usage
A page registration with breadcrumb and permission definition could look like this:
  app.registerPage('/a/b/c', MyComponent, {
    breadcrumb: (params) => `Breadcrumb for ${params.id}`,
    permissions: {
      'media-service': ['ADMIN', 'MOVIES_EDIT', 'MOVIES_VIEW'],
    },
  });
Eventing
The Piral instance provides a simple "Pub/Sub" eventing system that can be used to communicate between different parts of the application.
It consist of the following functions:
-
emit- to emit an event -
on- to subscribe to an event -
off- to unsubscribe from an event
Events are identified by a name string. When adding custom events, consider that the event name is global and needs to be unique to avoid collisions with other events.
Of course events are emitted to all pilets that are currently loaded. Since pilet loading is asynchronous, we do not recommend to emit events during the loading phase of a pilet as the consuming pilets might not be loaded yet.
Depending on the use case, an alternative could be to use the Key/Value Store discussed in the next chapter, where the producing pilet could store the data for the consuming pilet(s) in that store and the consuming pilet uses the getDataHelper method to retrieve the data timing independent.
More information about the eventing system can also be found in the Piral documentation.
Usage
The emitting pilet could look like this:
app.emit('my-event', { data: 'some data' });The receiving pilet could then look like this:
app.on('my-event', (data) => {
  console.log(data);
});
Key/Value Store
Another feature the Shell application offers is a simple Key/Value store that can be used to share data between different pilets.
It consist of the following functions:
-
setData- to store data in the store -
getData- to retrieve data from the store -
getDataHelper- a helper function that can be used to retrieve data from the store and wait for the data to be available if it is not yet available to avoid timing issues
Like with the eventing system, the Key/Value store is global and shared between all pilets. When adding custom data, consider that the key is global and needs to be unique to avoid collisions with other data.
More information about the Key/Value store can also be found in the Piral documentation.
Usage
The storing pilet could look like this:
app.setData('my-data', { data: 'some data' });The retrieving pilet could then look like this:
const data = app.getData('my-data');
console.log(data);
When using the getDataHelper method, the retrieving pilet could look like this:
app.getDataHelper('my-data', (data) => {
  // Will be invoked once, as soon as the `my-data` data is available.
  console.log(data);
});
Extension Components
The extension concept enables sharing components between different pilets. A pilet can register a component as an extension component and other pilets can then use this component in their pages.
The methods that drive the extension concept are:
-
registerExtension- to register an extension component -
unregisterExtension- to unregister an extension component -
Extension- a React component that can be used to define an extension slot in a page where extension components can be rendered -
renderHtmlExtension- to render an extension component in a non-React environment
The two main elements here are registerExtension and Extension.
Extensions are registered by providing a name and a React component. The consuming pilet then renders an Extension component with the same name in the location where the extension component should be rendered. It can pass down props to the extension component using the params property on the Extension component.
|
Note
|
Since micro-frontends are by definition independent from eachother, the consuming pilet needs to consider cases where the extension component is not available. For this case, the Extension component offers a fallback property that renders a placeholder component.Also note, that if there would be multiple pilets that register an extension component under the same name, the Extension component will (by default) render all of them.So basically the Extension defines a slot with a defined name that may be filled by zero to many registered extension components at runtime.
|
A more detailed description of the Extension concept can be found in the Piral documentation.
Usage
Assuming there is a micro-frontend dealing with image thumbnails (like our image service), it could register an extension component like this:
app.registerExtension('thumbnail', ({ params: { id } }) => (
    <img src={`https://some.url/${id}`} />
));
The consuming pilet then only would need to know the id of an image to render the thumbnail:
app.registerPage('/my-page', () => (
    <div>
        Look mom I can display a thumbnail without knowing anything about how it works:
        <app.Extension
            name="thumbnail"
            empty={() => <p>Maybe I overpromised...</p>}
            params={{ id: '1234' }}
        />
    </div>
));
When the providing micro-frontend now changes its business logic or add more features to the render, but the consuming pilet would not need to change anything. Though it is important to keep the interface of the component backwards compatible, as the consuming pilet might not be updated immediately.
To ensure type safety of the params property, the extension can be added to the PiralCustomExtensionSlotMap interface like this:
declare module "@axinom/mosaic-portal" {
    export interface PiralCustomExtensionSlotMap {
        thumbnail: ThumbnailProps;
    }
}

interface ThumbnailProps {
    /** The id of the image */
    id: string;
}
Providers
The providers concept is similar to the extension concept, but allows the registration of more things than just a React component. It can be used to register any kind of value that can be used by other pilets.
This concept is for example used to create extensibility points that go beyond the sharing of a React component.
For example the channel-service defines a provider type fast-provider, where customizable services can add registrations for each entity that they would like the channel service to allow adding to a channel playlist.
The shape of the registered object and its properties is usually defined by the service consuming the providers.
The fast-provider in the channel service for example expects two string properties (type and label) as well as a component (selectionComponent) that needs to implement a specific interface and a detailsResolver method, which will be used to generate a details link to the entity inside the playlist experience.
Other use cases may require a completely different set of properties.
The methods that drive the providers system are:
-
addProvider- to register a provider by specifying a name and the appropriate value -
getProviders- to retrieve all registered providers of a specific type
Usage
To register a provider, the addProvider method can be used:
app.addProvider('fast-provider', {
    type: 'Trailer',
    label: 'Trailer',
    selectionComponent: ({ onSelected, onClose }) => {
        // Add your custom selection component here (e.g. reusing an already existing select explorer)
        const items: ProgramEntity[] = [
        { title: 'One', videoId: '1', entityId: '1' },
        { title: 'Two', videoId: '2', entityId: '2' },
        ];

        return (
        <>
            <ul>
            {items.map((item) => (
                <li key={item.entityId}>
                <button onClick={() => onSelected([item])}>{item.title}</button>
                </li>
            ))}
            </ul>
            <button onClick={onClose}>Close</button>
        </>
        );
    },
    detailsResolver: ({ entityId }) => `/trailer/${entityId}`,
});
the consuming service then can use the following code to retrieve the registered providers:
const providers = app.getProviders('fast-provider');

if(providers.length > 0) {
    // in reality you should not access the providers through indexes as the order is not guaranteed
    providers[0].type; // returns 'Trailer'
    providers[0].label; // returns 'Trailer'
    providers[0].selectionComponent; // returns the selection component
    providers[0].detailsResolver; // returns the details resolver
}
Permissions
As mentioned above, each page can specify a list of permission that would grant a user access to the page. If a page requires a more detailed permission check or know more about the current user, it can be done using the following two methods on the PiletApi:
-
checkPermission- to check if the current user has a specific permission -
getToken- to retrieve the current user’s token
Like the permissions check defined by the page registration, the checkPermission method will only check if the user has at least one of the permissions listed in the page registration. To achieve an AND combination the method can be called multiple times.
The getToken method can be used to get the content of the authorization token. It contains information about the user like the email and the profilePicture as well as the list permissions the user has. This can also be used for a more granular permission check if needed.
This method is also typically used to retrieve the user’s token to pass it to a Mosaic service when making requests to the backend.
Usage
The following example shows how to use the checkPermission method to check if the user has the permission ADMIN on the media-service:
const hasAdminPermission = app.checkPermission({'media-service': ['ADMIN']});Notifications
This extension provides a way to manage toast notifications in shell application.
Toasts allow pilets to show a message to the user, independent of the current page. This is useful for example when a asynchronous operation finished but the user may already be navigated to another page. But it can also be used in other cases to give the user feedback about something that happened.
The methods that drive the toast notification system are:
-
showNotification- to display a new notification. It returns the ID of the notification, which can be used to update or dismiss the notification later. -
updateNotification- to update an existing notification with new content -
dismissNotification- to dismiss a notification
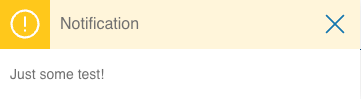
A notification consist at least of a title but can specify additional properties like the content that should go into the body as well as the type and a flag that specifies whether the toast should autoClose or not.
Usage
The following examples shows how to use the methods to display, update and dismiss a toast notification:
const notificationId = app.showNotification({
    title: "My notification",
    body: "This is the content of my notification",
    options: {
        type: "info",
        autoClose: false,
    },
});

app.updateNotification(notificationId, {
    title: "My updated notification",
});

app.dismissNotification(notificationId);
Indicators
This extension provides a way to manage indicators in shell application. Indicators can be used to provide the user information independent on the station they are currently on. For example they can be used to inform the user about the status or progress of a background operation, even if they are currently on a different page.

The save indicator is a special built-in indicator which the FormStation uses to indicate that a form is currently saving or whether the form is having unsaved changes. (Make sure you pass the app object to the UI library via the initializeUi method)
The methods that drive the indicator system are:
-
addIndicator- to display a new indicator. It returns the ID of the indicator, which can be used to update or dismiss the indicator later. -
updateIndicator- to update an existing indicator with new content -
removeIndicator- to dismiss an indicator -
setSaveIndicator- to set a custom state of the save indicator. This can besaving,inactiveordirty
Usage
The following examples shows how to use the methods to display, update and dismiss an indicator:
const indicatorId = app.addIndicator(<div>Indicator</div>);

app.updateIndicator(indicatorId, <div>Updated Indicator</div>);

app.removeIndicator(indicatorId);
The following example shows how to use the setSaveIndicator method to set the state of the save indicator:
app.setSaveIndicator(IndicatorType.Dirty);
app.setSaveIndicator(IndicatorType.Saving);
app.setSaveIndicator(IndicatorType.Inactive);
Navigation
The navigation extension provides a way to manage navigation items in shell application. It allows pilets to register navigation items that will be displayed in the side navigation panel.
The methods that drive the navigation system are:
-
registerNavigationItem- to create a new navigation item -
unregisterNavigationItemto remove an already registered navigation item -
setNavigationItemsTransformerto alter or reorder registered navigation items -
setNavigationTreeTransformer- to alter or reorder registered navigation items and navigation panel categories -
createNavigationConnector- to retrieve the navigation data in a pilet
A clickable navigation item will at least need the following properties:
- label - the text that should be displayed in the navigation panel
- categoryName - the section that the navigation item should be displayed in (dark blue headline)
- path - the url the user should be navigated to when clicking on the navigation item
However there is also the option to create expandable navigation items that can be used to group navigation items under a common headline. In this case the parent item needs to define a name, which the child item then uses as the parentName.
Usage
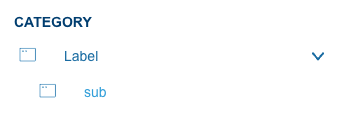
This example registers a two navigation items that are nested:
app.registerNavigationItem({
    label: 'Label',
    categoryName: 'Category',
    icon: <SomeIcon/>,
    name: 'top',
});

app.registerNavigationItem({
    label: 'sub',
    categoryName: 'Category',
    path: '/sub',
    icon: <SomeIcon/>,
    parentName: 'top',
});
this would render these two navigation items in the navigation panel:
Sorting & Reordering
Each registration for a navigation item will specify the category and potential parent item where the item should be displayed. However when developing a custom solution, you might want to alter the order of the items or even move items to a different category or parent item to better fit your needs.
This can be done using the setNavigationItemsTransformer and setNavigationTreeTransformer methods.
Both methods allow registering a function which will be used before the Navigation is rendered. The methods will be invoked with the current list of registered navigation items and the function can then return an altered version of the list.
The difference between the two items is primarily the call signature. The setNavigationItemsTransformer method will receive a flat list of navigation items and is expected to return a re-ordered flat list. The setNavigationTreeTransformer method will receive a tree structure of navigation items grouped by category and parent item and is also expected to return such a tree.
|
Note
|
It is also possible to alter the registrations in the transformer functions. So for example you can chose to remove a navigation item from the list or change its properties. |
Tiles
The landing page of the management system is a dashboard that is composed of different tiles. These tiles can be registered by using the following methods:
-
registerTile- to register a tile -
unregisterTile- to unregister a tile -
setHomeTileSorter- to define a function to tweak the sort order of the tiles -
createHomeConnector- to retrieve the tile data in a pilet
Each tile registration automatically register a corresponding navigation item that will be displayed in the navigation panel. This can be disabled by setting passing false as 2nd parameter on the tile registration.
Route Resolvers
When developing a pilet you may come across the need to add links to other pilets. One option would be, to find out the route signature and hardcode it in the link. However this is not a good idea, as the route signature may change over time and the link would break.
This is where the route resolvers come into play. They allow pilets to register a resolver function for a specific station. Other pilets only need to know the resolver station key and can then use the resolveRoute method to retrieve the route for the station of the foreign pilet.
The methods that drive the route resolver system are:
-
setRouteResolver- to register a route resolver -
getAllRouteResolvers- to retrieve all registered route resolvers -
resolveRoute- to resolves a route for a given station
Usage
The following example shows how to register a route resolver:
app.setRouteResolver(
    'movie-explorer',
    () => '/movies',
);

app.setRouteResolver(
    'movie-details',
    (dynamicRouteSegments?: { id: string }) => dynamicRouteSegments ? `/movies/${dynamicRouteSegments.id}` : undefined,
);
In order to provide type support for the above example for the movie-details resolver, the following declaration needs to be merged to @axinom/mosaic-portal module type declaration:
declare module '@axinom/mosaic-portal' {
    interface RegisterRouteResolver {
        ('movie-details', (dynamicRouteSegments?: {id: string}) => string | undefined): void;
    }
}|
Note
|
When a resolver is not able to resolve a route (e.g. because the dynamicSegments are not understood), it should return undefined. Each consumer of a route resolver needs to be prepared to handle this case.
|
The following example shows how to use the resolveRoute method to retrieve the routes:
app.resolveRoute('movie-explorer'); // returns '/movies'
app.resolveRoute('movie-details', '1234'); // returns '/movies/1234'
app.resolveRoute('movie-details', { id: '1234' }); // returns '/movies/1234'
app.resolveRoute('movie-details', { foo: 'bar' }); // returns undefined
Environment Information
These set of methods and properties can be used to retrieve information about the current portal environment and registered components.
-
meta- returns the meta information of the pilet (as received from the pilet feed) -
getEnvironment- return the information of the mosaic environment the pilet is running in -
getRegisteredExtensions- returns a key-value pair of registered extension slot names and an array of their components -
getRegisteredPages- returns a key-value pair of registered routes and their corresponding page components -
getRegisteredPilets- returns the metadata for the currently loaded pilets
Customizing the Shell
The management system shell and the built in Pilets offer the following options to change the look and feel of the application.
Custom Logo
To customize the logo in the top left corner of the application, a custom logo can be registered as Extension with the name logo.
Example:
app.registerExtension('logo', () => <svg>...</svg>);Custom Welcome Message
The welcome message on the home screen can be overwritten by registering an Extension component with the name landingPageHeader. If such a extension is registered, this component will be rendered instead of the default welcome message.
Example:
app.registerExtension('landingPageHeader', () => (
    <LandingPageHeader title="Hello" subtitle="World!" />
));
Environment Specific CSS Styling
Sometimes it is helpful to have visual differences between e.g. a development and a production environment to avoid confusion.
This can be accieved by using the environment specific class that is added to the body element of each management sytem. The class name is composed of the string env- followed by the id of the environment. (e.g. env-900c8d55-31d4-43ba-a73a-3f2289a7b2cc). This can be used to scope CSS rules to a specific environment.